In this post we will take a detailed look at starting a Java project from scratch, using the Gradle as the build tool.
Whenever I want to play with some JVM library, or I want to try out something, I try to use the thing in a minimal project. For me, that’s the best way to learn something: trying it the hard way. Even though in a real application I wouldn’t try to be so minimalistic.
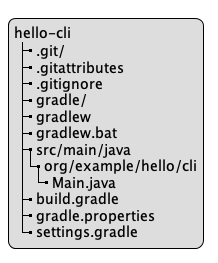
A Project Starts with an Empty Directory
Let’s imagine we just got inspired with an idea to build a command line interface (CLI) application that prints a greeting on the screen. We will call it Hello CLI.
All we need to start with is an empty hello-cli directory.
mkdir hello-cli (1)
cd hello-cli (2)| 1 | The mkdir command creates a new directory called hello-cli |
| 2 | The cd changes the notion of "current directory",
so that all the following commands happen in our newly created hello-cli directory |
Git has been the de facto version control system for software projects since forever. If you are not interested in tracking the changes, or you are going to use something else like Pijul, you can safely skip all the Git commands.
For Hello CLI, we expect it to have a long life, so we start by initializing
a minimal Git repository in the hello-cli directory.
git init . (1)
git commit --allow-empty -m "Initial (empty) commit" (2)| 1 | The init command (note the . at the end) creates a .git directory, which is managed by Git |
| 2 | The commit records our current version of the software.
The first commit in any Git repository is special in that
it’s the only commit that doesn’t have parents.
With the --allow-empty flag we can make it even more special:
no content either. |
Declare the Project a Gradle Project
For a project to be a Gradle project,
it needs to have either a settings.gradle or a build.gradle file.
Whichever you choose, an empty file would technically be enough.
So, a truly minimal Gradle project is just one empty file in an otherwise empty
directory. But we are not going to be that minimal.
I like to start with the settings.gradle file,
that at least declares the name of the project.
echo "rootProject.name = 'hello-cli'" >settings.gradle (1)| 1 | Here we create a file settings.gradle and write the line rootProject.name = 'hello-cli' in it. |
Without the project name in settings.gradle, Gradle would default to using
the directory name as the value of the project.name property.
In our case they are the same.
But if someone cloned this project to a differently named directory,
the project.name property would have that different name,
and in a more substantial build something could go wrong.
Another detail in favor of settings.gradle instead of build.gradle as the first file is that
if some ancestor directory contained a settings.gradle file,
then a lonely build.gradle file could be mistaken to be a Gradle subproject
in a multi-project build.
Quite unlikely, but still…
Anyway, with this part done, we can commit the progress to Git.
settings.gradle file to Gitgit add settings.gradle
git commit -m "Minimal Gradle project"And while we are at it (basically integrating Git and Gradle), we might want to
deal with the Gradle temporary files upfront:
when building stuff with Gradle, it stores the caches and build outputs in
directories .gradle and build under the project directory.
Since we are tracking changes, we don’t want those in source control.
Naturally, this is optional, and unnecessary if not using Git.
.gitignore fileecho ".gradle" >.gitignore
echo "build" >>.gitignore
git add .gitignore
git commit -m "Ignore Gradle caches and build outputs"Nail Down the Gradle Version
For more reliable builds, and for ease of Gradle upgrades across team members, we want to include the Gradle Wrapper in the source control. Again, this section is completely optional if you try to be truly minimalistic.
With Java and Gradle installed globally, we can add the Gradle Wrapper to our project:
echo "gradlew.bat -text" >.gitattributes
gradle wrapper
The gradle wrapper command generates a directory caller gradle and two scripts:
gradlew and gradlew.bat.
The gradlew.bat file contains Windows style line endings, so I tend to lie to
Git that it is not a text file.
This disables the automatic line ending conversions.
There are probably better ways to handle this.
All I want is that Git handles these files as they were shipped by Gradle.
Finally, commit the changes to Git.
git add .gitattributes gradle*
git commit -m "Add Gradle wrapper"
Implement the Java Application
Now we are ready to implement the Hello CLI.
Our application consists of three files:
-
A Java class called
Mainthat contains the so-called production code: code that our users run -
A
build.gradlefile that defines how to build and package the application, and how to run the application during development -
A
gradle.propertiesfile, which is optional, defining some common Gradle settings
Let’s start with the production code.
The conventional place for the production code is the src/main/java directory.
Under that directory, we have directories for our Java packages.
Main.java filemkdir -p src/main/java/org/example/hello/cliOur CLI application fits fine into the main method:
src/main/java/org/example/hello/cli/Main.java filepackage org.example.hello.cli;
public class Main {
public static void main(String... args){
System.out.println("Hello, World! Running on Java "
+ System.getProperty("java.version"));
}
}Now to the build file, build.gradle.
build.gradle fileplugins {
id 'application' (1)
}
java {
toolchain {
languageVersion = JavaLanguageVersion.of(17) (2)
}
}
application {
mainClass = 'org.example.hello.cli.Main'
}| 1 | The application Gradle plugin gives us the ability to run our JVM application during development.
It also automatically applies the java plugin so that Gradle knows how to build and package the
code. |
| 2 | The Java version we declare here does not have to be the same as we have globally. This is the version of Java that will be used to compile and run our Hello CLI. The version used to run Gradle can be different. |
We can do some exploratory testing by running the application:
./gradlew run (1)| 1 | If you skipped the Gradle Wrapper installation, you would use your
globally installed gradle command here. |
Gradle will automatically recompile any changes before running the application.
If it seems to be working, let’s commit and call it a day.
git add src build.gradle
git commit -m "Minimal Java application"
Declare the Application Version
As mentioned in the previous section, we can add Gradle configuration in a gradle.properties file.
This is optional.
The configuration that I tend to add to new projects is as follows:
gradle.properties filegroup = org.example
version = 0.1.0
#org.gradle.caching=true
#org.gradle.configuration-cache=true
#org.gradle.configureondemand=true
#org.gradle.parallel=true
org.gradle.welcome=neverThe reason I tend to declare the group and version in gradle.properties instead of in build.gradle
is that, when I refactor the project into multi-project build, I don’t need to repeat them in subprojects.
The settings that I left in comments are related to build optimizations and are not enabled by default by Gradle. The comments are there to remind me that when the project begins to be more substantial, I can review those optimizations and see if they work with our build. The relevant documents can be found from the Gradle Build Environment page.
Conclusion
Even a small project like this, the project already has three aspects to it: it is a Git project, a Gradle project, and a Java project.